|
|
How to add products on Amazon Seller Central? Where can I manage my orders? Can I see my business reports? How to view the performance of my account health?
Are these questions bothering you?
Then worry not! You are at the right place!
The fact is, handling Amazon Seller Central can be tricky and overwhelming, especially if you are a new seller. That’s why you need a clear understanding of Amazon Seller Central. This platform helps you to manage every aspect of your Amazon seller business.
Within this guide, you’ll learn the ins and outs of Amazon Seller Central, from adding products to accessing sales reports. Whether you’re a beginner or an experienced seller, this guide provides all the information you need to successfully manage your Amazon business.
Let’s get started!
Here’s a quick peek into the article
What is Amazon Seller Central
What can you do in Amazon Seller Central?
What necessary information do you need to get started?
How to create your Amazon Seller Central account
How much does it cost to sell on Amazon?
How are you going to sell your product: FBA or FBM
What are the essential features of the Amazon Seller Central dashboard?
How to add products on Amazon Seller Central
Expert Tips for selling profitable products on Amazon
Amazon Seller Central: Do’s or Don’t’s
What is the procedure for changing account information in Amazon Seller Central?
Can you give your Amazon Seller Central access to a third person?
How to contact Amazon Seller support
Wrapping it up
What is Amazon Seller Central?
Amazon Seller Central is an online dashboard that allows any seller to start, manage, and grow their Amazon business. Sellers can use it to manage their payments, product catalogs, inventory, order fulfillment, pricing, advertising, and more.
It’s a portal where you can start and manage your online business without having to worry about things like designing and maintaining a personal website or even processing returns.
If you opt for Amazon FBA (Fulfillment by Amazon), Amazon can take care of the rest, like picking, packing, and shipping your orders, making it easier than ever to become an Amazon seller.
Understanding the intricacies of Amazon’s Seller Central can help you better prepare for your journey to becoming a successful seller.
What can you do in Amazon Seller Central?
When we talk about Amazon Seller Central, we usually refer to it as the primary hub for Amazon sellers.
Well, it is the core of your Amazon operations.
There are tabs at the top of the page that will give you access to all the features. You can do a variety of operations using Amazon Seller Central. You can manage your products, inventory, orders, reports, and more. On top of it, you can create, manage, and track listings, view performance analytics, set up promotions, and access customer service tools.
Wait, there’s more..!
You can also view business and inventory reports, as well as manage your payments.
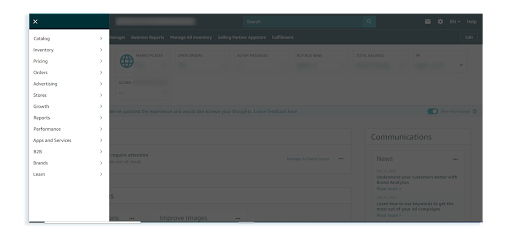
When you click on the left-hand side menu bar, you can find these options. We’ll explore these options extensively in a bit.
Let’s start with the Amazon account setup.
What necessary information do you need to get started
To start selling on Amazon, you should begin by setting up your Seller Central account.
Before beginning, make sure you have the necessary information ready so that you can complete the process quickly.
Here are the details you need.
Bank account number and bank routing number
Chargeable credit card
Government-issued national ID
Tax information
Phone number
How to create your Amazon Seller Central account
To create an Amazon Seller Central account, here’s what you do:
1. Go to https://sellercentral.amazon.com/.
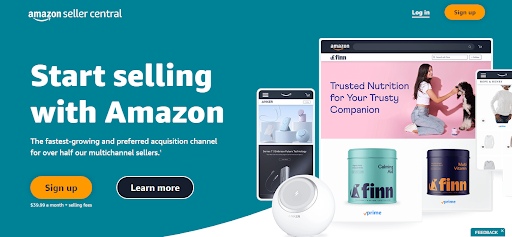
2. Click on “Sign up”
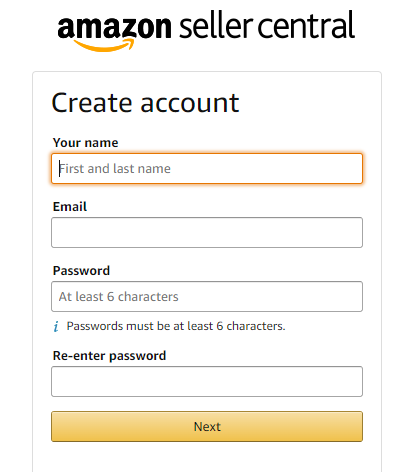
3. Enter your name, email ID, and password
4. Select your country and language.
5. Enter your business address and telephone number.
6. Choose the selling plan you want to use (Individual or Professional).
7. Provide your bank and tax information.
8. Read and accept the Seller Agreement and Privacy Notice.
9. Select “Create your Amazon account.”
10. You will receive a confirmation email. Click on the link in the email to complete your registration.
Amazon Seller Central offers two plans. They are the Individual Selling Plan and the Professional Selling Plan. These two differ primarily in terms of projected sales volume.
1. Amazon’s Individual selling plan
The Amazon Individual Selling Plan enables you to sell your products on Amazon without the hassle of a subscription plan. It is the perfect plan for sellers with low-volume sales or are just starting.
With the Individual Selling Plan, you are only charged $0.99 per item sold, making it affordable and convenient. There are no additional upfront fees or monthly charges. All you should do is register and start selling – it’s that simple!
2. Amazon’s Professional selling plan
The Professional selling plan offered by Amazon Seller Central is the most comprehensive plan designed for established businesses looking to sell on Amazon. Besides, you can opt for a professional selling plan if your business gets decent sales volume. It includes additional features, such as bulk upload, inventory control, management features, reporting, Amazon advertising, and the Amazon API for connecting with third-party apps. These features are not available for the Individual plan.
Also, the professional selling plan offers an additional ten bonus product categories not available with the individual selling plan. Plus, you don’t have to worry about variable fees based on the number of sales, as the professional plan charges a fixed monthly fee of $39.99.
How much does it cost to sell on Amazon?
No matter what you’re selling, there are different fees you could be paying – depending on your selling plan and the types of products you own.
1. Subscription fees
The cost of your selling plan will depend on which plan you choose.
The Professional selling plan requires a flat fee of $39.99 per month with no per-item fee.
The Individual selling plan requires a $0.99 fee for each item sold.
2. Selling fees
This fee is charged for each item sold. They include referral fees (a percentage of the selling price that varies by product category) and variable closing fees (which apply only to specific media categories).
3. Shipping fees
There is a shipping fee when you fulfill orders yourself. The shipping fees will be applied based on the product category and shipping service chosen by the customer.
4. FBA fees
Amazon FBA Fees is the fee associated with order fulfillment, storage, and additional services for items fulfilled by Amazon (known as Fulfillment by Amazon, or FBA).
How are you going to sell your product: FBA or FBM
There are two ways in which you can sell your product: FBA or FBM
Fulfillment by Amazon (FBA) is a service offered by Amazon that allows sellers to store their products in Amazon’s fulfillment centers, and Amazon will take care of shipping and customer service for those products.
On the other hand, Fulfillment by Merchant (FBM) is a service where sellers handle their fulfillment and shipping. This is a great option for sellers who have their resources and want to have more control over their fulfillment process. It also allows sellers to customize their shipping options and offer multiple shipping methods.
However, it’s better to determine which service to select based on your product’s size and weight.
If you have a large volume, high margin product that requires little hands-on involvement. Then, FBA is the way to go – Amazon will handle the storage and shipping for you, giving you more time to focus on other aspects of your business.
On the other hand, if you’re looking for a smaller scale, small-margin product or a one-off product, FBM (Fulfillment By Merchant) may be the better option. With FBM, you’ll have more control over your inventory and be responsible for storing and shipping yourself.
What are the important features of the Amazon Seller Central dashboard
These are the features you should understand while using Amazon Seller Central.
1. Catalog
The Catalog section of the Amazon Seller Central dashboard is an important feature for sellers. This section allows you to create and upload new products or add a product that already exists on Amazon. You can also save your previous work as a draft and get back to upload it at a later point in time.
Additionally, you can use this section to edit information about the products you are selling on the platform. This can include updating the product descriptions, photos, and pricing.
2. Inventory
Inventory is a vital tab on the Amazon Seller Central dashboard. This is where you can manage your product inventory and take all the necessary steps to ensure that your items are always in stock. This includes managing shipments you send to Amazon’s warehouses for FBA, as well as setting up a global presence for your brand.
So if you want to manage your inventory, go to the “Inventory tab”, where you can find different options like
Manage Inventory
Sell Globally
FBA
Inventory Planning
Shipments
Opportunities
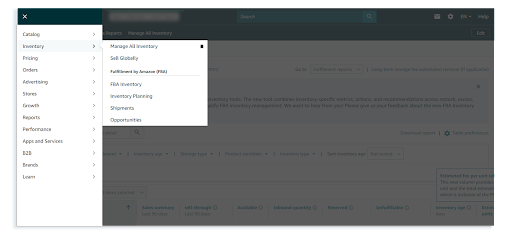
One of the main go-to hub sections for all product-related things would be “Manage your inventory.” In this section, you can see and manage all your products. With just a few clicks, you can adjust pricing, add new items, and get an instant overview of your sales rank and Buy Box eligibility.
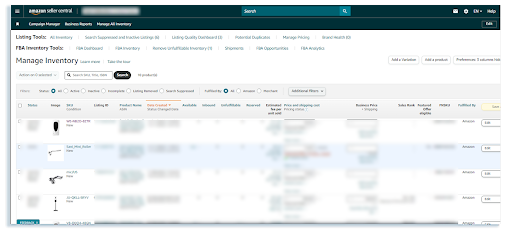
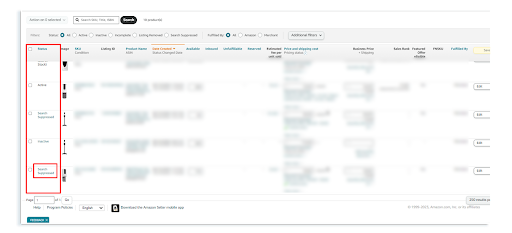
This inventory section is the perfect spot to check for any potential issues with your current listings. If your item is suppressed for any reason, you’ll find it listed under the “Status” column. With such helpful features, you can assure that your inventory is always in top shape and ready to sell.
3. Pricing
With the Pricing dashboard, you can set and observe the price of your products on Amazon. This allows you to set the pricing of your products, set alerts, and automate the process so that the price of your items changes for your competitors. Additionally, you can take advantage of fee discounts if you are eligible.
4. Orders
The Orders screen in the Amazon Seller Central Dashboard allows you to view all orders your business is receiving, as well as the fulfillment status of each order. This includes the number of orders that are pending, shipped, and unshipped, as well as any returns that need to be processed.
5. Advertising
The advertising feature in the dashboard allows you to create and manage campaigns for your products. You can use Amazon PPC to create campaigns and optimize them with metrics like ACoS, conversions, and sales. You can also use promotions, coupons, and Amazon Lightning Deals to market your products.
Finally, with Amazon Brand Registry, you can leverage Amazon Enhanced Brand Content to make your product listings stand out and improve conversions.
So how do you use the advertising in Amazon Seller Central?
As an Amazon seller, you need to create a variety of different ads to promote your products. For instance, you can use Sponsored Products ads to showcase your items and attract more customers. If you’re enrolled in Brand Registry, you can even take advantage of Sponsored Brands and Sponsored Display ads to further enhance your advertising efforts.
To start with it, go to the “Advertising” tab and select “Campaign Manager” in Seller Central.
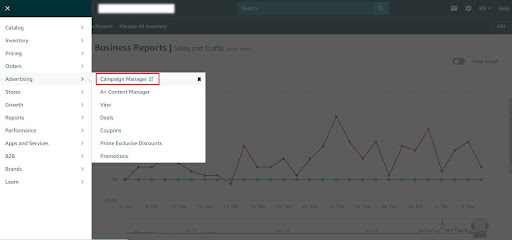
You will be taken to the advertising console page, where you can observe your current ads or create new ads.
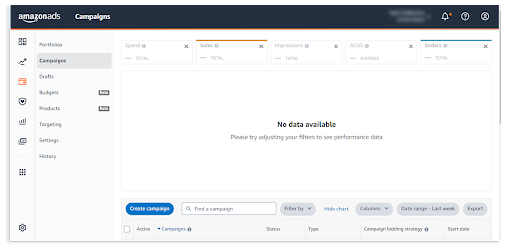
Another feature in the advertising option is the Brand Store. Sellers who are enrolled in Brand Registry on Amazon can use this feature that allows them to establish a personalized Amazon Store. This store allows registered brands to promote their products exclusively without any interference from competitors’ products or ads. It has the appearance and atmosphere of a typical e-commerce store, with the added advantage of Amazon’s enormous audience reach.
With the “Measurement and Reporting” metrics, you can understand and improve the performance of your advertising. Measuring the effectiveness of advertising helps to understand its impact on sales, subscriptions, and customer acquisition.
It is essential to comprehend the available insights and reporting mechanisms that can aid in measuring ad performance and making informed decisions to optimize campaigns.
If you want to set up a PPC campaign from scratch, check out this article.
6. Reports
Reports help you track your business’s health, such as payments, orders, advertising, and taxes. You can look at different metrics across the reports and make informed decisions about future investments or troubleshoot any issues that may arise.
So how do you use these reports?
As a seller, it is essential to keep a balanced overview of all these metrics as they provide data about your product performance and help scale the business.
To access sales and traffic reports per product, navigate to the “Reports” tab and click on “Business Reports” within Seller Central.
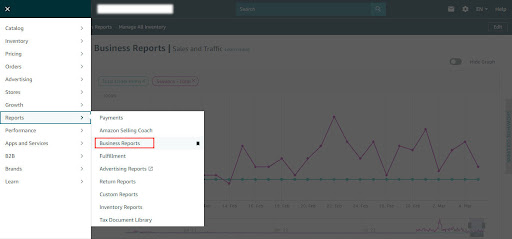
In the report section, you will be able to access different reports based on the performance of your product.
7. Performance
This section allows you to monitor customer feedback, messages from buyers, A-to-Z guarantee claims, chargeback claims, and performance notifications. It helps you keep track of customer sentiment for your business and allows you to take corrective action if needed. It also provides customer insights and access to Seller University, so you can stay updated with the latest trends in the industry.
The “Performance” tab on Amazon Seller Central provides crucial information about your account’s health, including Customer Service Performance, Policy Compliance, and Shipping Performance.
In case of policy violations or negative seller feedback, this section alerts you, and if not addressed, it could lead to account suspension.
To check your account health, navigate to the “Performance” tab and click “Account Health” on Amazon Seller Central.
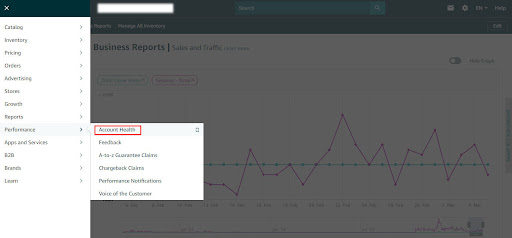
To know more about your Account Health Rating, check out this article.
How to add products on Amazon Seller Central
Here is a step-by-step guide on how to add products on Amazon Seller Central
Login to Amazon Seller Central
Navigate to the “Catalog” tab on your Amazon Seller Central Dashboard.
Select the “Add a Product” option from the dropdown menu.
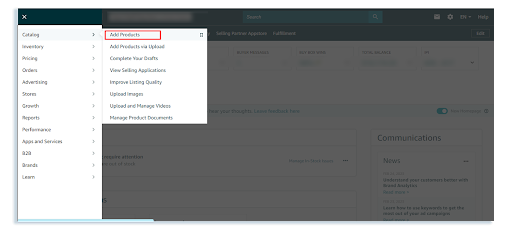
4. If you want to sell a brand new product, click “I’m adding a product not sold on Amazon.”
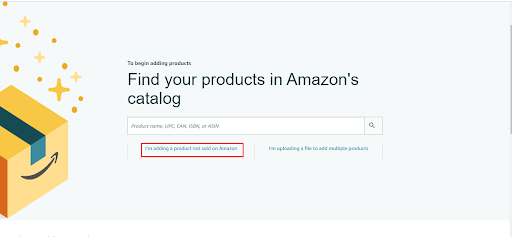
5. Select your product type. This is the category in which your product will be listed, so make sure you give accurate information.
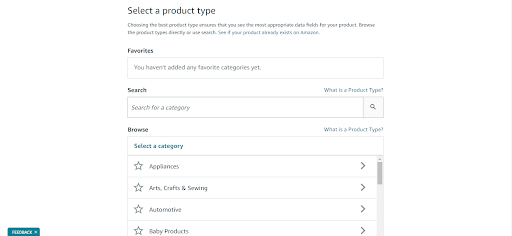
6. Also, you can search for your product type and select a matching category
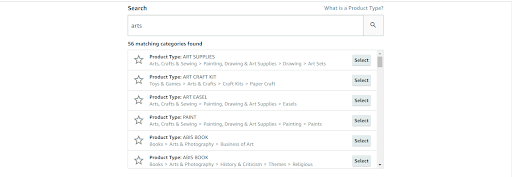
7. Once you select the product category, fill in fields with product information such as title, brand name, UPC, images, and search terms.
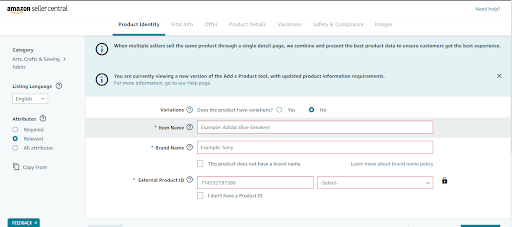
To add a product that is already listed for sale on Amazon,
Go to “Add a Product” and enter the ASIN of the item.
You can find the ASIN of a product in the product details section of the product’s listing page.
If it is the appropriate product, click “Sell this product.”
Then you can create an offer. You can also specify your price and choose a fulfillment method such as FBA or FBM.
Expert Tips for selling profitable products on Amazon
If you want to know how well a particular product performs in the market, then, there’s a simple way to discover the right products to sell on Amazon with SellerApp’s Opportunity Score.
It gives a snapshot of just that!
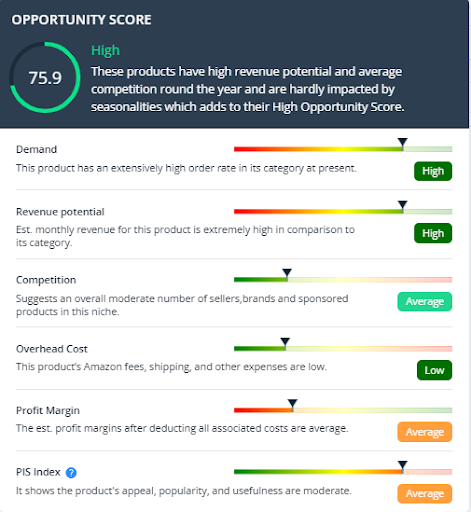
SellerApp’s Opportunity score considers a product based on their six metrics.
Demand: This metric shows if the product has demand on Amazon. Higher demand implies a better order rate in its category.
Revenue potential: It evaluates the revenue potential of the product. If this product’s estimated monthly revenue is high, you will be getting a good profit.
Competition: It shows the overall competition of the product.
Overhead cost: This feature shows if the product’s overhead costs are low or high, which affects the profitability of the product. If the products Amazon’s fees, shipping, and other expenses are low, they can have good profitability.
Profit margins: It analyzes whether you can make a decent profit with the product. After deducting all the associated expenses, if it’s high, then that product generates more profit from its sales.
PIS Index (Product Innovation Scope): This metric analyzes the selected product if it has good scope for improvement or innovation.
To check the Opportunity score of your product,
Login to SellerApp dashboard
Click the Product Intelligence tab
Once you click on it, you can see a table view of all the products with a separate column
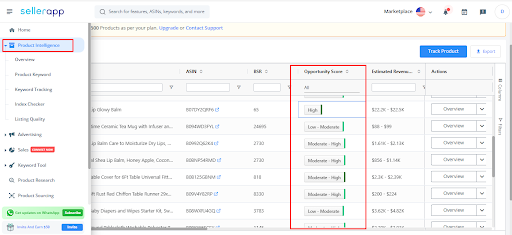
Scroll to the right and find the Opportunity score column for the products.
Once you click on it, you’ll see the Opportunity Scorecard.
Depending on the product’s opportunity score, you’ll find low, moderate, and high values. It’s better to have higher scores.
Additionally, ensure that you glance at this checklist to come up with the right product. It makes your job easier.
The product’s price should fall between the range of $10 and $50
The product should make at least 10 sales a day
The top 3 related keywords should have 10,000+ monthly searches on Amazon
Don’t go for a seasonal product. Products should sell year-round
The product should be small and lightweight (under 2 to 3 pounds)
There shouldn’t be any brand names or trademarks associated with the product
The product should be set up for 25% or even lesser than the sale price
There should be proper room for product optimization and improvement of present listings
There should be multiple product-related keyword opportunities
The product should have quick and easy sourcing from China
The product should not be fragile
You should be able to expand your brand with related products
The product should not have any legal issues
The product should encourage recurring purchases
Additional Read: What are the most popular items to sell on Amazon
Amazon Sellers Central: Do’s and Don’t’s
Let’s face it – you are bound to make potential mistakes as other sellers make. So if you want to be a better seller, keep an eye on these few things while on Amazon Seller Central.
Amazon Seller Central – Do’s
1. Work on your Product Listing
When selling products on Amazon, it’s important to ensure that your product listings are written effectively and engagingly. This means taking the time to create high-quality product descriptions that include relevant keywords from an Amazon seo perspective.
You should add your product description in bullet points, which should be impactful and concise. Additionally, you should take advantage of all the space Amazon provides to describe your products, as it is limited. To do this, you must undertake keyword research to identify top-selling Amazon keywords for your products. Additionally, you can also look into Amazon Enhanced Brand Content and other strategies to write meaningful product descriptions.
Check out this article for an in-depth understanding of How to make your Amazon product listing efficient
2. Learn to read your business metrics
Analyzing your key business metrics is essential to growing your business consistently. These metrics give you a clearer picture of how your business is doing and allow you to identify which areas need improvement.
You should track key performance indicators such as the number of times people have viewed your products, the number of sales made, conversion rates, the number of reviews, and other relevant metrics. You can make informed decisions that will help you maximize your profits.
Taking the time to familiarize yourself with these metrics is a great step forward in ensuring that your business is successful on the Amazon platform.
3. Observe your inventory level
Monitoring your inventory level is an essential step in ensuring that your products are well-stocked on Amazon. Not only does this help you maintain a good ranking in the search results, but it also helps Amazon provide its customers with a world-class shopping experience. When you have an adequate inventory level, you can quickly replenish your stock when it runs low, which will help you stay ahead of the competition. Furthermore, you can ensure your products are in stock and satisfy your customers if you proactively track your inventory levels and have a well-defined process for restocking.
4. Provide customer service
As an Amazon seller, it is vital to ensure that you provide the best customer service. Customers shopping online want to do business with someone who is known for delivering exceptional customer service. This means that you need to be able to process returns and refunds and answer any queries about the product. If you use Amazon FBA, then you don’t have to worry about it. However, if you don’t use FBA, then you will need to set up your infrastructure to handle these tasks. Additionally, you should ensure you deliver orders on time to avoid negative feedback. By providing excellent customer service, you can help to build customer loyalty and keep your customers satisfied.
5. Research on the marketing campaigns
Amazon Sponsored Ads, also known as Amazon Pay-per-Click campaigns, are one of the most popular marketing strategies used by Amazon sellers. This type of campaign works by setting a budget for specific target keywords for your products, and Amazon will then display your advertisement alongside the search results for those keywords.
When a potential customer clicks on your ad, they will be directed to your product page, and you will pay Amazon for the click. You can either manually select the keywords or rely on Amazon’s automated targeting system to pick the best keywords for your product.
A successful PPC campaign can improve your visibility, drive more traffic to your products, boost your brand’s image, and improve your rankings. However, managing a successful PPC campaign takes time and effort, as you need to constantly monitor what works and refine your keywords based on the traffic they are bringing.
If you find it hard to manage your campaigns, you can try using the SellerApp advertising dashboard to get detailed insights on your bids, keywords, and campaigns. Our platform works on machine learning algorithms that can analyze thousands of data points from Amazon and offer profound actionable insights for you.
6. Look into your taxes
As an Amazon seller, you must understand your tax liabilities and make sure that your documents are in order. Understanding taxes can help you down the lane, such as a call from the IRS. We’d suggest you take professional help if you are not aware of the process and need help to stay on track with taxes. This will help you manage your taxes and ensure your business runs smoothly.
Amazon Seller Central – Don’t’s
1. Don’t provide expensive/late shipping
Shipping is one of the most important considerations for any online shopper, and as an Amazon seller, you must ensure that you provide reasonable shipping fees and timely delivery. Overcharging for shipping or providing late shipping can cause customers to abandon their carts, resulting in lost sales and revenue. To maximize your success, you should always strive to keep your shipping costs low and ensure that deliveries are always on time.
2. Don’t purchase reviews
Reviews are incredibly important for the success of your product on Amazon, but you should never make the mistake of trying to purchase them. Amazon has taken strict measures to ensure that all reviews on its marketplace are genuine and honest, and it’s against its policy to even solicit reviews. Instead, you can use more legitimate methods like Amazon’s Early Reviewer Program, PPC ads, and social media promotion to drive traffic to your page and get genuine reviews.
3. Don’t fail to understand Amazon’s fees and charges
When it comes to selling on Amazon, it’s important to understand how Amazon charges for its services. Knowing how much you’ll be charged for each service can help you determine your margins and profits. To do this accurately, use Amazon’s FBA calculator to estimate your profits before selling. Additionally, make sure to account for additional costs such as overhead, advertising and branding, referral fees, and more that could affect your overall profits. Understanding Amazon’s fee is key to making sure your business is successful.
4. Don’t use more than one seller account
You can’t use multiple accounts until you have a legitimate business justification like
If you own multiple brands and have to maintain each business separately
If you need to manufacture products for two distinct or separate companies
If you are selling the same product in different regions
What is the procedure to change the account information in Amazon Seller Central?
Given below is the procedure to change account information
1. Log into your Amazon Seller Central account.
2. Go to the “Settings” tab in the top right corner.
3. Click on “Account Info.”
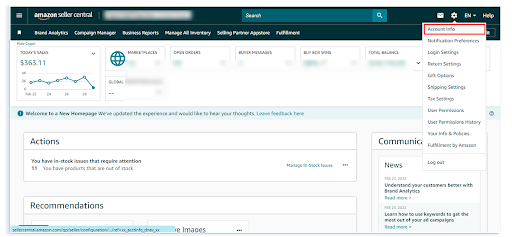
4. Select the specific information you would like to change (e.g. store name, business address, etc.).
5. Make the desired changes.
6. Click “Save” when you are finished.
7. Review the changes to make sure they are correct.
8. Click “Submit” to confirm the changes.
Can you give your Amazon Seller Central access to a third person?
Yes, you can give access to a third person to your Amazon Seller Central Account.
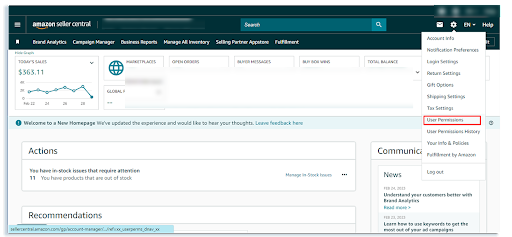
To do so, you must navigate to “Settings” in the top right corner and click on “User Permissions.” Here, you can add a third person as a user to your seller account. This can be beneficial if you have employees or virtual assistants that help run your business.
How to contact Amazon Seller support
If you need to contact Amazon Seller Support, there are a few ways to do so.
You can use the Amazon Seller Central website to access the Contact Us page. This page provides a variety of options for addressing your inquiry.
You can search for help topics within the Help & Customer Service section or call the support team directly.
You can also reach out to the Seller Support team via email or live chat.
No matter what method you choose, Amazon Seller Support is available to help you with any questions or concerns you may have as a seller.
Wrapping it up
Mastering your Amazon Seller Central is an essential component of any successful seller.
If you can efficiently manage them, then it can help your Amazon business. With the help of this guide, you should now better understand Amazon Seller Central and how to best manage them.
Amazon definitely holds great significance today, and the internet is full of success stories of people who highlight how Amazon helped them quit their 9-to-5 corporate jobs. As you progress, learn to understand all the key features so you can maximize the benefits of the platform.
Do you find this article useful? Do share your thoughts in the comments below!
You can also follow the SellerApp blog as we bring you the latest seller updates, tips, and strategies to help you make the most of Amazon as a seller.
Happy Selling!
Additional Guide:
What Are The Common Amazon PPC Mistakes
How to create an Amazon wish list
Types of Delivery Services Offered by USPS
Was this post helpful?
Let us know if you liked the post. That’s the only way we can improve.
Related posts:
What can you do if your Amazon Seller Central Account gets Suspended?
Amazon FBA Explained: Your Complete Step-By-Step Guide to Selling Success
Everything You Need to Know About Amazon For Business
Strategies to Minimize Amazon FBA Inbound Placement Fees
Post Written by:
Arishekar N
Arishekar N, Sr. Director of Marketing & Growth at SellerApp, is a specialist in digital marketing, in addition to website keyword optimization for search engines. His areas of expertise include enhancing the organic & paid ranking of webpages on search engines with innovative SEO & SEM strategies and online promotions.
Ask anything or share your feedback Email: arishekar.n@sellerapp.com
Was this post helpful?
Let us know if you liked the post. That’s the only way we can improve.
|
上一篇:连连国际官网-LianLianGlobal下一篇:一文教会你分清亚马逊Seller Central, Vendor Express, Vendor Central的区别
|